正文
export default function (Vue) { const version = Number(Vue.version.split('.')[0]) if (version >= 2) { const usesInit = Vue.config._lifecycleHooks.indexOf('init') > -1
Vue.mixin(usesInit ? { init: vuexInit } : { beforeCreate: vuexInit })
} else {
const _init = Vue.prototype._init
Vue.prototype._init = function (options = {}) {
options.init = options.init
? [vuexInit].concat(options.init)
: vuexInit
_init.call(this, options)
}
}
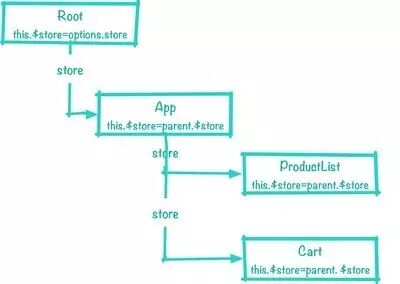
具体实现:将初始化Vue根组件时传入的store设置到this对象的$store属性上,子组件从其父组件引用$store属性,层层嵌套进行设置。在任意组件中执行 this.$store 都能找到装载的那个store对象,vuexInit方法实现如下:
function vuexInit () { const options = this.$options
if (options.store) { this.$store = options.store
} else if (options.parent && options.parent.$store) { this.$store = options.parent.$store
}
}
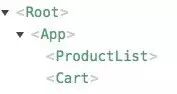
看个图例理解下store的传递。
页面Vue结构图:
对应store流向:
上面对Vuex框架的装载以及注入自定义store对象进行分析,解决了问题1。接下来详细分析store对象的内部功能和具体实现,来解答 为什么actions、getters、mutations中能从arguments[0]中拿到store的相关数据? 等问题。
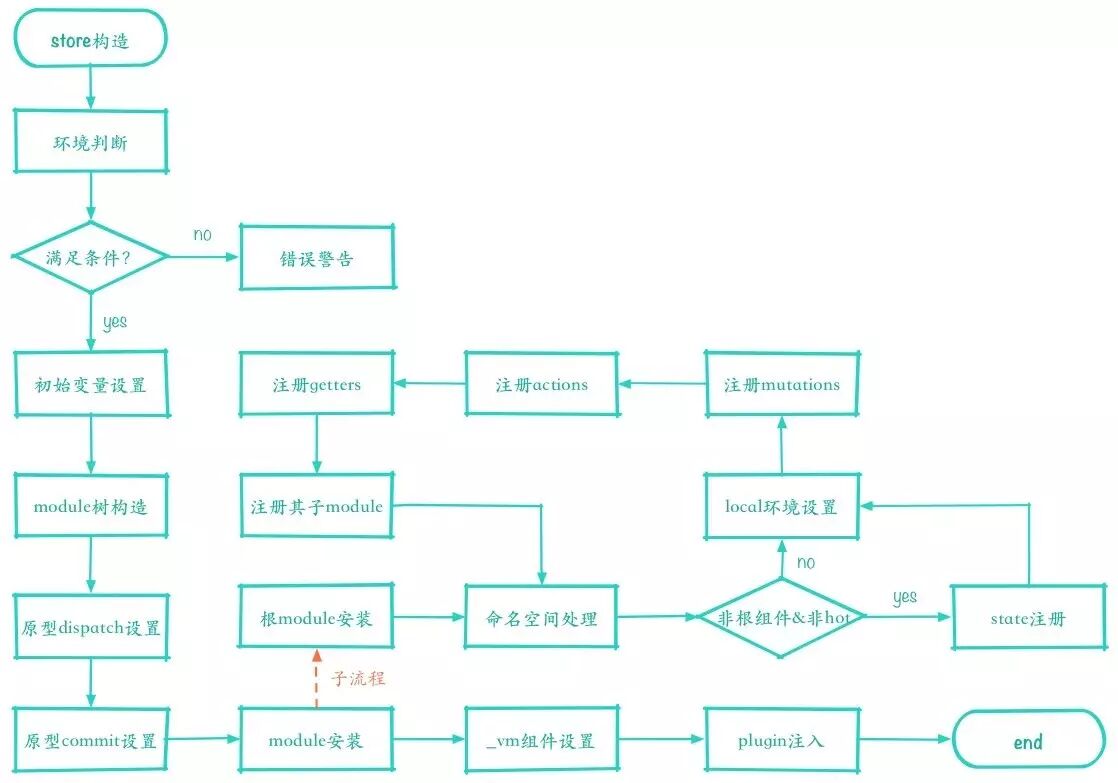
store对象实现逻辑比较复杂,先看下构造方法的整体逻辑流程来帮助后面的理解:
环境判断
开始分析store的构造函数,分小节逐函数逐行的分析其功能。
constructor (options = {}) {
  assert(Vue, `must call Vue.use(Vuex) before creating a store instance.`)
  assert(typeof Promise !== 'undefined', `vuex requires a Promise polyfill in this browser.`)
在store构造函数中执行环境判断,以下都是Vuex工作的必要条件:
-
已经执行安装函数进行装载;
-
支持Promise语法。
assert函数是一个简单的断言函数的实现,一行代码即可实现。
function assert (condition, msg) {  if (!condition) throw new Error(`[vuex] ${msg}`)
}
数据初始化、module树构造
环境判断后,根据new构造传入的options或默认值,初始化内部数据。
const {
state = {},
plugins = [],
strict = false} = optionsthis._committing = false this._actions = Object.create(null) this._mutations = Object.create(null) this._wrappedGetters = Object.create(null) this._modules = new ModuleCollection(options) this._modulesNamespaceMap = Object.create(null) this._subscribers = [] this._watcherVM = new Vue()
调用
new Vuex.store(options)
时传入的options对象,用于构造ModuleCollection类,下面看看其功能。
constructor (rawRootModule) {
this.root = new Module(rawRootModule, false)
if (rawRootModule.modules) {
forEachValue(rawRootModule.modules, (rawModule, key) => { this.register([key], rawModule, false)
})
}
ModuleCollection主要将传入的options对象整个构造为一个module对象,并循环调用
this.register([key], rawModule, false)
为其中的modules属性进行模块注册,使其都成为module对象,最后options对象被构造成一个完整的组件树。ModuleCollection类还提供了modules的更替功能,详细实现可以查看源文件
module-collection.js
。
dispatch与commit设置
继续回到store的构造函数代码。
const store = thisconst { dispatch, commit } = thisthis.dispatch = function boundDispatch (type, payload) { return dispatch.call(store, type, payload)
}this.commit = function boundCommit (type, payload, options) { return commit.call(store, type, payload, options)
}
封装替换原型中的dispatch和commit方法,将this指向当前store对象。
dispatch和commit方法具体实现如下:
dispatch (_type, _payload) {
const {
type,
payload
} = unifyObjectStyle(_type, _payload)
const entry = this._actions[type] if (!entry) { console.error(`[vuex] unknown action type: ${type}`) return
} return entry.length > 1
? Promise.all(entry.map(handler => handler(payload)))
: entry[0](payload)
}
前面提到,dispatch的功能是触发并传递一些参数(payload)给对应type的action。因为其支持2种调用方法,所以在dispatch中,先进行参数的适配处理,然后判断action type是否存在,若存在就逐个执行(注:上面代码中的
this._actions[type]
以及 下面的
this._mutations[type]
均是处理过的函数集合,具体内容留到后面进行分析)。
commit方法和dispatch相比虽然都是触发type,但是对应的处理却相对复杂,代码如下。
commit (_type, _payload, _options) {
const {
type,
payload,
options
} = unifyObjectStyle(_type, _payload, _options) const mutation = { type, payload } const entry = this._mutations[type] if (!entry) { console