正文
In
part one, I discussed some quick study vignettes of the cliff retreat
design. For part two, I want to go into more depth about how I used a
Material ID render channel to speed up my material selections and
generate these illustrations in a relatively short amount of time. This
not only streamlines my Photoshop workflow, but also allows me to make
quick updates to my Photoshop files later if my design changes. By
utilizing Material ID channels and masked groups, I can simply render
out a new ID every time I make a change to my design, update the ID
layer in my Photoshop file, and then use that new ID to update my masks
as needed. Below is a quick explanation of how I do that.
Part1
中,
A
神的主题是一些快速
P
图的小技巧,这一部分主要想介绍如何使用
ID
渲染通道加快材质选择,并在较短时间内完成这些图像。这样不仅简化
Ps
工作流程,并且可以在操作新方案时迅速更新
PS
材质库。通过使用
ID
材质通道和屏蔽组,使得在更改设计时只需要更新一个新的
ID
,更新
PS
中的
ID
层和掩码。
1. TURN ON MATERIAL ID CHANNEL
打开
ID
材质通道
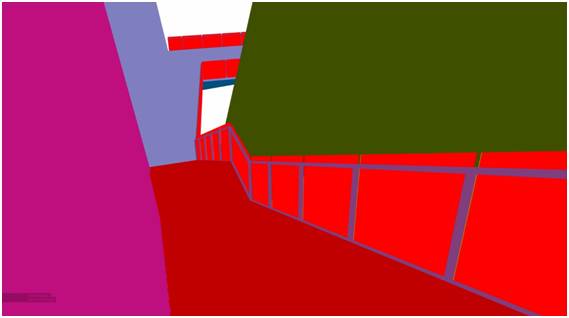
In
this tutorial, I am using V-Ray for Sketchup which automatically
generates colors for each texture used in the model. Above is the what
the Material ID channel looked like for my view. Most rendering programs
like V-Ray offer the ability to create a Material ID channel.
A
神此次使用
V-Ray
对
SU
模型中每个材质生成颜色,一般来说市面上大多数渲染程序都可进行这方面的设置。
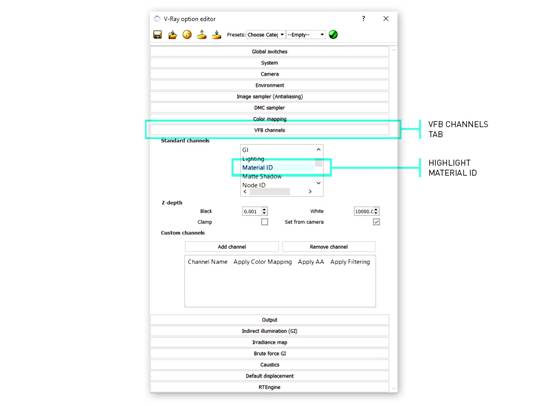
To
turn on the Material ID channel, open the V-Ray Option Editor dialogue
box, and go to the “VFB Channels” tab. In that tab, find“Material ID” in
the Standard Channels list and select it. Now that it is selected,
V-Ray will generate this channel when you render the image.
打开
ID
材质通道需要先打开
V-Ray
编辑器对话框,转到“
VFB
通道”选项卡,在这个选项卡中在标准通道列表中找到并选择“
ID
材质”然后生成通道。


